Friday, January 17, 2014

My Girl

My goal in 2014 is to pull out some of the products I bought sometime ago and did not use. 
Starting here with a layout of my Grand Daughter, I've used some Recollections glitter, pearls, tiny heart gems and even tinier clear seed beads. All glued down with Glossy Accents.

Another item bought and not used was a package of Cloth Stem Wire. This soft very flexible wire works well to create a twisted string effect, like I have done here to in-circle the photo. Also wrapped some around a skewer to give it that spring look or little wondering vines among the leaves look.   

The lovely flowing clusters of leave on a branch are chipboard die cuts from Creative Embellishments. First I sprayed the bare chipboard with Tattered Angels Glimmer Mist....Coffee Shop. Spraying this dark of a color on bare chipboard gave the chipboard a dark rich color. In the title "My Girl" the chipboard had first been painted white and then sprayed. If you look closely you can see the title is a lighter brown.


I plan to add a few words down in the right hand corner, but I haven't decided yet just what I want to journal. I'm really loving the way the new unused products came out on this layout. Now what else haven't I opened that I need to use???? Come back for my next project and see.
Thank you for coming by to take a look. If you would like to see a video showing more on this Layout go to... https://www.youtube.com/user/MooreArtFromTheHeart 
Have a great day! Hugs and Smiles from Laurie Moore
                                     Here I've added the journaling. Thank you for stopping by.


Tuesday, January 14, 2014

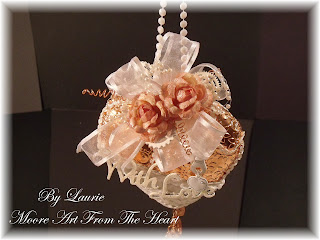
Copper and Lace Heart


This lovely Copper and Lace Heart is a gift for a very sweet friend. It hangs from a chain of pearly white trim and is finished with dangles of copper trinkets.
   
The beautiful chipboard words here are die cuts from Creative Embellishments along with the small white gears die cuts in and around the ribbons.
The dangles here started off as different colored trinkets so I painted them with copper paint to match the copper sheets at the top of the heart. I also added copper wire springs for that whimsical touch.  
 Here's the back view which I finished as well.
For a video check my Youtube channel .... https://www.youtube.com/user/MooreArtFromTheHeart

To buy the copper sheets, head over to my Artfire Store... http://www.artfire.com/ext/shop/studio/MooreArtFromTheHeart ..... and look under supplies.
Thank you for stopping by. Smiles and Hugs, Laurie

Monday, January 13, 2014

Sweet Mail by Laurie

These chipboard die cut words are from Creative Embellishments Check out there store for more great products.
What's a mailbox with out love notes and a box for sweet chocolates. I've used the same papers and embellishments to help it coordinate with the mailbox.  


Fun whimsical hearts on curly wire and a bright feathered humming bird add just the right touch.   


l
Adding magnates to the metal stand to hold the metal mailbox on, was a way to help break it a part for storage. 


This is a Mailbox and stand I created for a Valentine's home decor' piece. Check out the video showing how this was put together. ...https://www.youtube.com/user/MooreArtFromTheHeart
Thank you stopping by.
Laurie
Link to Artfire store for products.. http://www.artfire.com/ext/shop/studio/MooreArtFromTheHeart
Link to Creative Embellishments... http://creativeembellishments.com/

Friday, January 10, 2014

Card for Grandmother's 98th Birthday

This is a card I made for my Sweet Grandmother 98th Birthday. I love that my Grandmother is still with us. She's a beautiful lady that has lived a long and wonderful life. She and my Grandfather who passed away a few years ago raised 6 children and now have 75 descendants.
I have a video showing this card on my Youtube channel. Here's the link...https://www.youtube.com/user/MooreArtFromTheHeart
Also here's a link to my Artfire store where you can find the copper sheets I used to create the metal hearts...http://www.artfire.com/ext/shop/studio/MooreArtFromTheHeart
thanks for peeking in on me,
Many Hugs, Laurie

Friday, December 20, 2013

Blue Baby Shoes

Here's a look at a few of the baby shoes I put together for a baby shower. These 10 shoes are for a custom order from my Artfire store Moore Art From The Heart The picture below shows just a few of the pieces used in the arrangement. Using antique baby shoes that I altered gave the arrangement a vintage cute look. These will make great table decorations and then gifts for the guest.

Check out the video I did showing how these were put together. My link to my Youtube channel Moore Art From The Heart Youtube
Thanks for stopping by. Please become a follower.
Laurie Moore

Tuesday, December 10, 2013

Baby Steps


 Here's a look at some baby shoes I altered. As you can see from the picture above, I started with old baby shoes that I picked up on one of my travels to Missouri. All the shoes came tucked down in a large square jar. There were a total of 10 shoes in all. There is nothing more exciting to me then to take a trip Antique Junking and score goodies like these adorable finds. Let me tell you it wasn't easy getting that jar of shoes squished into an already very full suitcase but I did it. If I had to leave clothing behind, those shoes were coming home with me. lol
I first started by painting them all with white gesso and then using a emery board to sand back off some of the gesso in places to make them look worn again. I then used glitter and spray to give them that little bit of Christmas sparkle. Filled them with greenery and small treasures.
Please visit my youtube channel to see more on these sweet baby shoes. Also find some of these cute Christmas treasures in my Artfire store.
Thank you, Laurie

My Artfire Store....Baby Shoes
My Youtube Channel .....


Friday, December 6, 2013

Sweet Tussie Mussie's


The word “Tussie-mussie” is a quaint, endearing term from the early 1400s for small, round bouquets of herbs and flowers with ­symbolic meanings. Because the flowers usually came in a cone shaped container now days we tend to call the cone it's self a tussie mussie. No matter what you call it Tussie Mussie's are fun and easy to make. I first created a floral spray of greenery, flowers, a vintage photo and a few other goodies all placed together and then wrapped with florist tape. By creating a floral spray like this, the arrangement holds together in place when the cone is moved around, like when it's hung on a door. The floral arrangement also can be removed and other goodies can be added or change out the arrangement for a different holiday themed one.
I have a video also showing how I put together these sweet Tussie Mussie's. Take a look... SweetTussie Mussie
Your comments are welcomed here,
Hugs Laurie

Tuesday, December 3, 2013

Oh! Christmas Tree


Here's how all three trees looked when finished and set in my center piece (minus the sleigh which was to big). Scroll down to the post showing some of the steps to creating these trees. Watch a tutorial video on my Youtube channel showing you how to create your own. Happy Holidays My Friends.
My video link.... Oh! Christmas Tree!
Many Hugs, Laurie