Sunday, April 26, 2015

Creative Cone Challenge

Hi My Friends, Do you like fun challenges and a chance to win gift certificates! Come join me on Facebook where we do just that! Here's the link to the fun....
Laurie Moore's 2015 Challenges


This month challenge is called  "Creative Cones" 
All you need to do is purchase your paper mache' cone from my Artfire store
and decorate it in anyway you would like to and add your pictures of it to my Facebook page. All the rules are on the challenge page along with lots of ideas to help you out!

Come see what my Design Team Members have created to give you inspiration. 

Here's the first inspirations to get you going!


And from one of my Designers here's Kimberly Moore lovely creation.


Here's the beautiful and creative cone project from my Designer Laura Bomber. Visit Laura's blog for even more inspiring projects.... http://laurabomber.blogspot.co.uk/


Look at the gorgeous cone my Designer Becky Colvin has created using some hand made flowers to set off this lacy wonder.


*******************************************

Now for our entries .......

#1 entry is from Peggy Gansberg
https://www.facebook.com/thepossibilitiesrendless


#2 entry is from Cathie Cowles


#3 entry is from LaCrisha Oliverio


#4 entry is from Becky Long 


#5 entry is from Deborah Gamboa  


And the winner of this months Cone Challenge is........


# 3 entry LaCrisha Oliverio

Congratulation LaCrisha you won the $10.00 gift certificate to my Artfire store.

  Thank you to all the entries this month and all the other challenges. They were all fantastic! 

We will be off for the summer and return with new challenges in September. 
Have a wonderful summer everyone!!

Happy Crafting to All,
Laurie

Please leave your comment below so I know who saw this post.Thanks

Wednesday, April 8, 2015

Playtime with Grand-kids

I was looking for something fun to do today with my grand-kids and remembered the post from Our Creative Corner where the lovely DT Claudia talked about what to do when you have a creative block. The project she did was just what we were looking for.
My 4 year old Grandson Brahm said he wanted to use fingerpaint and his fingers to create his. Crystal and I decided to follow along in the same process Claudia used.
Pop over to the blog the OCC and see for yourself how inspiring Claudia's idea is.


Thanks for visiting,
xxx Laurie Moore

The 3D Prima Matte Gel is sold in my Artfire store... http://www.artfire.com/ext/shop/home/MooreArtFromTheHeart

Monday, March 30, 2015

OCC April Challenge "Color Your World"

I am so excite to be this months challenge host for the OCC. Coming up with the theme for this months challenge came to me while out working in my garden.    
Here in the United States we are coming into spring - the season when nature comes forth with new life.
Soft green grasses grow in the fields and the trees bloom in glorious colors with the promise of fruit.
Tulips and daffodils emerge from the soil after a long winters nap.
The colors of spring, the sights and sounds of nature at this time of the year renews my soul.
In the spring time the colors of nature are different around the world.
For my challenge this month I want you to
Color Your World
For this challenge create a project with the colors of spring time where you live.
Show us what colors renew your soul

Our wonderful sponsor this month is
 and they are offering a $25 gift certificate to our randomly drawn winner this month! Also more goodies for the top three winners as well.        
    Thank you Creative Embellishments

I love the warm sunny days that come with Spring. They're always so welcome after many months of cold  and rainy days. So my first thought for the canvas was to add a feeling of sunshine. 
Staring with an 8 x 10 canvas, I added a coat of Gesso and a mask from TCW called Butterflies to add one more layer of texture. Using Distress Sprays from Ranger, the hues of yellow sunshine came alive on the canvas. Now for more colors in my world, greens and splashes of pink.
 Every Spring setting around me this time of year has flowers and this canvas is no exception. The chipboard words tell my story of the peaceful feeling Spring brings to me.
 
Thank you for join me here and I hope you get a chance to come play with us over at

xxx Laurie 


Saturday, February 28, 2015

OCC Challenge Junk in Your Trunk

Candice our Challenge Host for March at Our Creative Corner has a challenge for you.

 Create something out of any kind of junk and re-fashion it either into something useful, functional or beautiful for the
 challenge this month.
Candice is leaving the challenge open to your interpretation of what constitutes “Junk”
It may mean a set of hideously patterned china that you want to smash up and a make a mosaic...
It may mean reams of patterned paper you have lying around that you turn into a collage masterpiece...
It may mean doing something with skeins of wool that you intended to make a a sweater with...
It may mean doing something with rusty keys, nuts and bolts and random pieces of wire that you pick up off the street...
  You can create whatever you want to, however you want to and with whatever you want to.
The only rules are that your project MUST contain something that you consider Junk that you have reclaimed or recycled.

  Check out the OCC blog for great ideas from all our creative designers. You'll also find the rules to add your project to this challenge and don't forget to check out our fantastic prize sponsor Crafty Individuals
This challenge inspired the gift I put together for my Dad's birthday. I love altering and repurposing items. For my project I pulled out a few junk items to work with, old book papers, cardboard and maybe a little something unexpected, egg shells. 
The metal home decor plate I used as background was a great piece to alter and give to my Dad for his Birthday. He's the little boy in the pictures there with his older brothers. 
I adhered the book paper down with Prima Soft Gel to the metal plate. With inks and sprays it was transformed into a vintage styled background for the embellishments and old picture that was added. 

 The egg shells were used to create a mosaic pattern inside the watch. Then alcohol ink and Distress embossing powder were added along with a metal tag and an antique typewriter key.

Most of the items placed on this layout were inked, embossed, rusted, and painted to give them the feel of a time gone by. This is one of my favorite looks and mediums to work with. 
I finding that I love adding the copper micro beads around in my arrangements. It's like adding the look of dripping metal amount the vintage finds.  
I have a video on my Youtube channel showing my process. Come take a peek and hopeful you will learn a few new techniques or just be inspired to try this project. 
Link to Youtube channel...   youtube.com/user/MooreArtFromTheHeart


Products used here can be found in my Artfire store... artfire.com/ext/shop/home/MooreArtFromTheHeart

Thanks for stopping by, 
xxx Laurie Moore

Sunday, February 1, 2015

OCC Challenge Tic Tac Toe

Here's a great challenge from Julia, one of my team mates and Designer over at Our Creative Corner.
We would love you to come play along and here's the link..... http://ourcreativecorner6.blogspot.com/2015/02/tic-tac-toe-fun.html
Just a few rules to this challenge.....
 For this challenge please choose one line from the grid shown. This can be a horizontal, vertical or diagonal line but you must select the middle square as one of your choices. What you make is your choice but please ensure that the three items you have chosen are clearly visible on your make. Please state in your post which line you have chosen. Inks, stains, sprays etc can be used as necessary on your project.
For the two bottom corners you see more than one chose in the square, if you choose one of these squares you may use just one item listed there or as many of the items in that square as you would like to use. Just remember to let us know which items you used.

Please check out this month wonderful sponsor 
Tando Creative  http://www.tando-creative.co.uk/catalog/


For my project I choose "Paint, Stamps and Stencils" I've want for some time now to start making Journal covers for a few gifts to give. This cover is of my daughter and sweet grandson. I've recently discovered 3D Gel mediums from Prima and this challenge inspired me to give the transparent gel a try with the stencil and mixing it with paint. I am loving the look of it! A lot of the products I used here can be found in my online Artfire Store with a link below.
  I started with an 8"x10" piece of chipboard that I painted with gesso. I then used strips of paper from the Romance Nouel collections which I adhered down with the 3D gloss gel medium, another great use for this gel. I then began adding my Distress spray stains. Once they were dry then came gesso with one stencil and 3D gel with the other. (these next pictures are from the tutorial I did)

Using light blue paint mixed with 3D gel and my fingers I applied lines of paint around the edges of the strips of paper to bring out the outlines and this also added another layer of texture. I stamped using one of the 3D stamps I carry. I used the set with the dragonfly which was what my grandson was so intently watching on the porch that day. On the Dusty Attic chipboard I added sprays and distress embossing powder. 

Flowers from the Coffee Break collection with distress embossing powder applied on the edges added just the right touches around the black and white photo. Using black paint I covered the word "tender" and place it across the photo. Black gesso around the edges and the project was complete, ready to be bond with paper and a back cover.

I also have a video tutorial on my YouTube channel you can check out Youtube OCC Feb. Challenge

For products used visit http://www.artfire.com/ext/shop/home/MooreArtFromTheHeart 

Thanks for coming by and becoming a follower, 
Laurie Moore 

Friday, January 23, 2015

My Art Journal 2015

 I started my first art journal to start off the new year. I've wanted to venture out more into mix media in my work for sometime now. There's something so exciting about trying new forms of art that keeps my soul happy. I've been collecting mix media products to play with and watching YouTube videos of all the best designers when ever I could. Meeting Ania Dabrowska also know as Finn or Finnabair at CHA and watching her demonstrate her new line of mix media products was diffidently a highlight for me. I also got to meet another artist I admire Mister Tim Holtz. I think both of these artists are crazy talented and inspiring. 


I know I usually take a show pictures here of my processes as I go along but this time I found myself totally immersed in the techniques of using 3D gel and distress spray stains. That and my fingers were covered in goodness to messy to touch a camera with. You'll have to stay tune and I'll try to take pictures next time. I will tell you thought the products I used here and tell you they can be found in my Artfire store.
I used 3D Gloss Gel , paper from the collection Romance Novel by Prima, Chipboard from Dusty Attic, Ranger Distress Spray Stains,  Crafter workshop templateMix Media Art Journal, Metallic Rub-on paint, white gesso, and Wild Orchid roses.

Thank you for following along on my journey, 
Laurie Moore

Wednesday, January 21, 2015

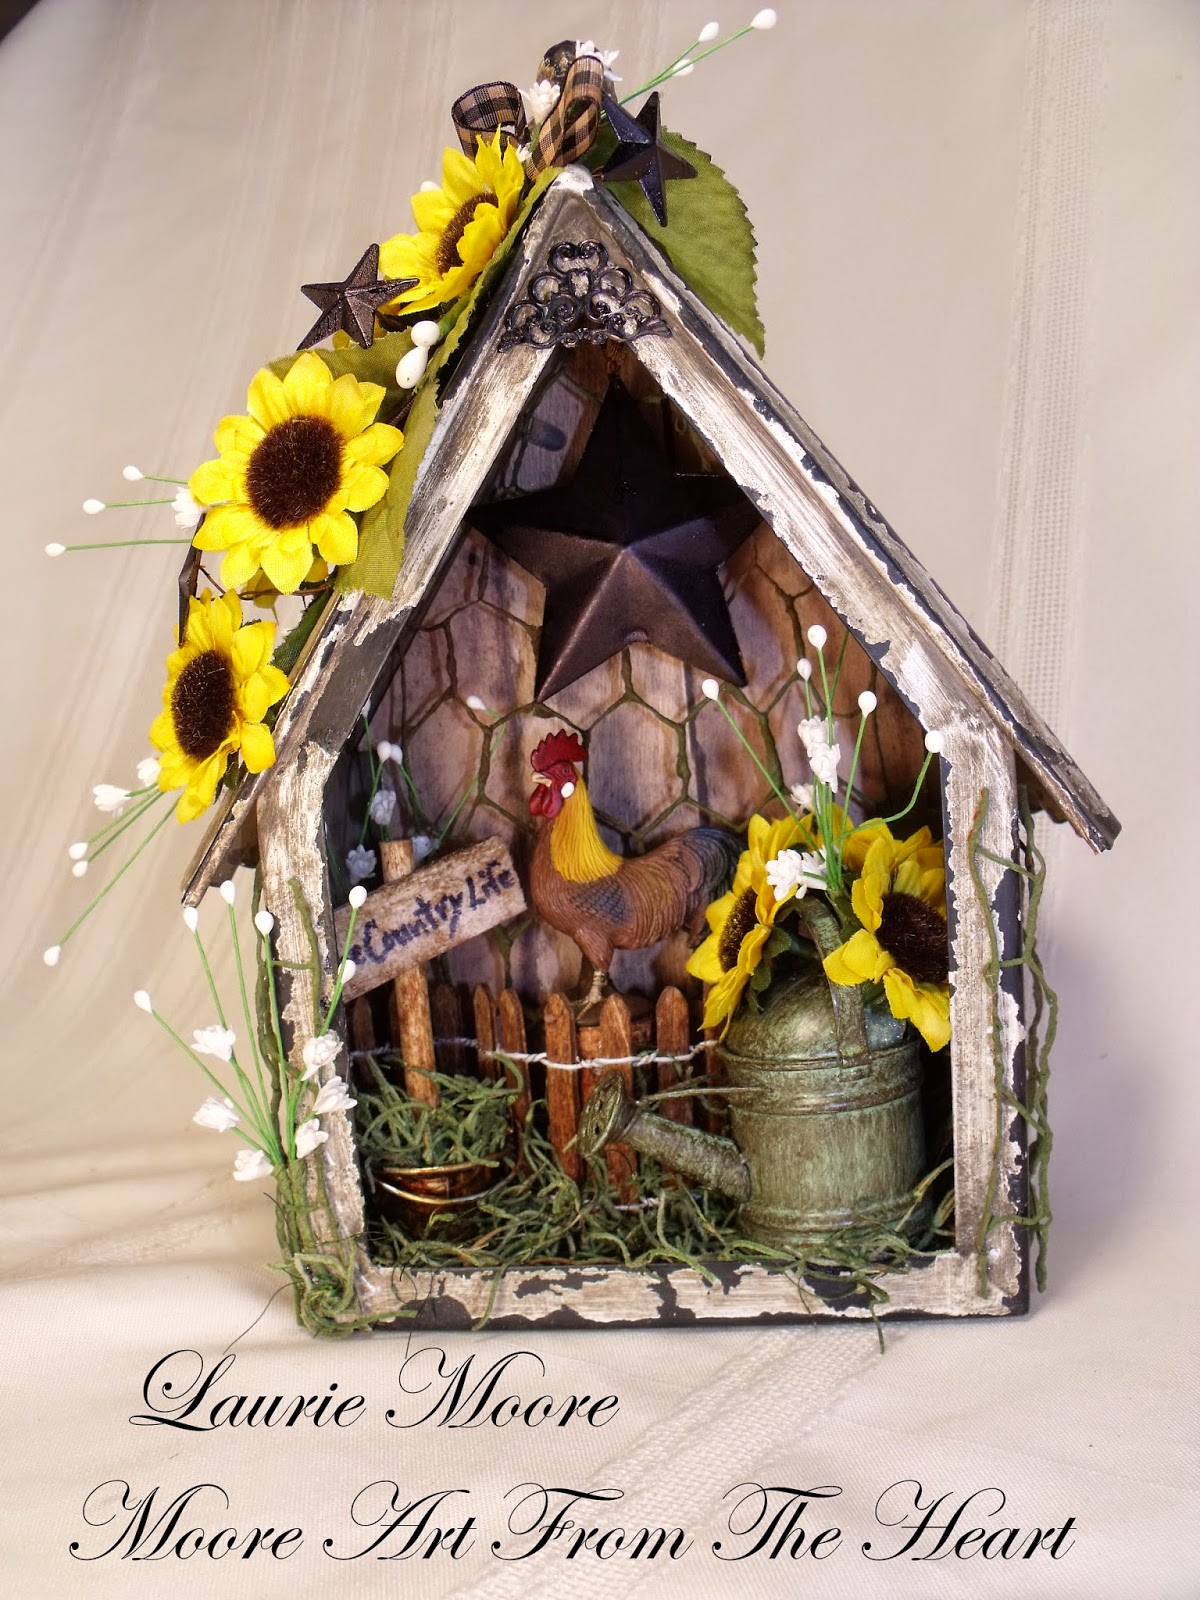
Prima Birdhouse Frame - Gift for Kimberly

I am having so much fun making up these Prima metal birdhouse frames. This is my third one so far. This frame is easy to transform into a great decoration piece for your home. Add family photos or just match the home decor like I did here. This is a gift for my sweet daughter Kimberly who's kitchen has a beautiful country theme to it with roosters, sunflowers, and antiques.
   I started with a Metal Birdhouse Frame by Prima and left the outside as it came with it's worn weathered look.
For that old barn feel, I used a sheet of paper with a wood grain pattern on it at the back. 
Next I took a few metal rusty stars and add black alcohol ink to them.
 Then added chicken wire, sunflowers, stars, wooden fence, grass, and this tiny little rooster.  
 I picked up a mini water-can that had the perfect green patina on it. Now every good country scene needs a sign. So I used a dowel and a little pieces of wood that I then sprayed with TH's Distress spray stain in walnut. With a felt pen I wrote the words "The Country Life". I then looked around for something to hold up the sign. I found a tiny pail to place it in which added that last touch to the country look I was going for.  

 Come check out my Youtube channel for a video of this project.
Thank you for peeking in on me, xxx Laurie

Birdhouse can be found in my Artfire store. Here's the link... www.artfire.com/ext/shop/home/MooreArtFromTheHeart


Monday, January 5, 2015

GDT for NatashaScrapbooKorner....... "Love Flies High"

2015 started off on an exciting note with a guest design team invite from Natasha Cantwell of  NatashaScrapbooKorner on Zibbet. Here's my first project of 2 using a paper kit called black-white-kit  from her store. You can find all the links below.

Also I have a video on my Youtube channel MooreArtFromTheHeart Come take a peek.
I wanted to create a few projects showing what could be done with a paper kit besides making layouts or cards and decided covering a box for my valentines was a good way to share an idea.  First I started with a cigar box. Cover with black card stock and the paper from the kit. Laying the papers in different sizes and shape is an easy way to add pops of color through out the box.
Next I used gesso and fine glitter to soften the edges and add some sparkle. With a heart mask, gesso and more glitter little touches of love were sprinkled about. I like my glitter to stay in place so after the gesso dries and coat those areas with gel media to seal them. I took the nylon netting in pieces here and there for some wonderful texture.
The kit came with tulle which I bunched it together tied up with wire to make little pompoms. These were added around the ribbon roses. Under those clutters, I added more of the nylon netting. I used a Prima zipper pull for the handle. Added tiny metal legs and words that say it all made it look complete but wait time to add an element of surprise.
This sticking cute metal plane was just right. Finding little treasures like this is always fun and helps give the project it's theme which in this case was as the title says... "Love Flies High" I transformed the plane with gesso, glitter, nylon netting and wired hearts.


I finished the inside with more of the paper kit and some of the extra goodies Natasha sent me.
Here's the links to the store, products and the great team mates of Natasha Design Team.
Thank you for peeking in,
Laurie Moore

NSK store: https://www.zibbet.com/natashascrapbookorner
NSK FB page: https://www.facebook.com/NatashaScrapbooKorner
NSK G+ page: https://plus.google.com/100126526613935230435/posts
Zucchinikitty: https://www.youtube.com/user/ZucchiniKitty
ThePassionForCraft: https://www.youtube.com/user/ThePassionForCraft
Roxycar11: https://www.youtube.com/user/roxycar11
Guest Designer Carla Peterson https://www.youtube.com/user/pinklola37
My Kit from NSK https://www.zibbet.com/natashascrapbookorner/black-white-kit

My Youtube video https://www.youtube.com/user/MooreArtFromTheHeart